Tuesday, August 13, 2013

New Thinlits Dies

If you love making interactive cards, you'll LOVE these brand new Thinlits Card Dies from Stampin'Up!  They're so new they're not in any catalog yet!  Watch this video to see how quickly these thinlits can help you make a swing card.  Each set (Circle or Label) also comes with additional thinlit shapes for embellishing your card.


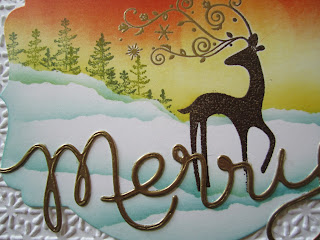
Stampin'Up! has also included a new die set in their Holiday Catalog called Thinlits Expressions.  It consists of three cursive words (Thankful, Love and Merry--featured on the cards below).  Tip--include a piece of waxed paper between your card stock and the thinlit to make it easier to remove.  All the thinlits (and framelits) work so well with the new Magetic Platform for the Big Shot.  The Magnetic Platform has been so popular that Stampin'Up! is not currently taking any more orders for this until they catch up with production.  It should be available for order again sometime in September.  I'll post an announcement here when they are available again.  (Purchase a new set of cutting plates for maximum performance, as it works better with a flat plate.)  I love mine!

The following cards feature the Thinlits Expressions Die (Merry).  In both examples "Merry" was cut using Whisper White card stock, embossed (1st example w/ Pewter ep; 2nd example w/ Gold ep), then attached using Tombow liquid glue (the pointy end makes it easy to apply).


In both cards Dasher (retired) was embossed with a combo of Early Espresso ep and Pewter or gold to match "Merry."


Happy Stamping!
Marge

Friday, August 9, 2013

Back to Stamping!

Our summer has been a little crazy so far, but now that we have a new driver in the family, I don't need to be the taxi driver as much.  So I'm using some of my newfound time to  plan some classes.   So I thought I would share some of the projects from some of my recent classes.

This sympathy card was inspired by a card I found on Pinterest.  I love the simplicity of the layout.  The window was cut with Stampin'Up!'s Window Frame Framelit.  The "aha" moment for me was the technique for the frame around the window.... before removing the framelit, use the writing tip of a Stampin'Write marker to make the dots, dashes, or whatever you like around the edge of the framelit.  When you remove it, you have a perfect frame around your window.  I then scraped a sponge loaded with Soft Suede ink across the edges of the window to add depth.  The bird and greeting are from the Simply Sketched set, which is a hostess set.  I love the greetings that come with this set!

This "Just for you" card  is embellished with vellum card stock flowers, stamped with the Secret Garden set and cut out using the matching framelits and the new Magnetic platform for the Big Shot.  What a fantastic tool.  It really holds your framelits in place so you get a clean cut!  It helps to have nice flat cutting pads though.  Before stamping the vellum, brayer or sponge color onto one side and allow to dry.   Then stamp and cut out your image (I stamped on the side that was colored), turn it over and use an old fashioned embossing stylus and foam pad to "freestyle emboss" your image.  The very talented Jank Tink posted a great video tutorial showing this technique on her blog.

This card reminds me of the beach.  Maybe it's the colors or the embossed striped background that was sanded to give it that distressed look (that's because I used Stampin'Up!'s Core'dinations card stock, now available in all their colors...this is Strawberry Slush, one of the new in-colors).  I love the new ruffle stretch trim (only available in the new in-colors, this one is Coastal Cabana).  The background is stamped using the Very Vintage jumbo wheel, and the greeting and label under it were stamped using the Chalk Talk set.  The label was cut out with the matching Chalk Talk framelit.  The greeting is colored with marker directly to the stamp using Coastal Cabana, Brown Sugar and Strawberry Slush, all new in-colors.

Happy Stamping!
Marge

Friday, June 14, 2013

Mystery Hostess Cyber Workshop -- Deadline June 21st at 11 p.m.

Stampin'Up!'s brand new Catalog is up and running, so in honor of that I'm having a Mystery Hostess Cyber Workshop.  Stampin'Up! recently added the Hostess Code to our online ordering process, enabling us to combine online orders with a workshop order.  That means that smaller orders can be combined to earn FREE hostess benefits that I can pass on to you!  That also means that when you have a traditional workshop, friends and family who cannot attend (from anywhere in the U.S.), can place an online order that counts toward your workshop total.  How cool is that?!!

So let's get started!
  • Place a minimum order of $50 or more (before shipping and tax) in my online store by 11 p.m. on Friday, June 21st.  (Click on the "Shop Now" button in my Stampin'Up! website.)
  • Once you add your first item, enter the code listed below in the Special Offers section.  Marge Thuen should show up as the Hostess.  
  • Once all the orders are in, I'll draw one name to get ALL the Hostess Benefits on the entire order!  I will enter your name once for the first $50, then again for every $25 after that.  ($50 order, 1 entry; $75 order, 2 entries; $100 order, 3 entries; and so on)  If your order is $150 or more, DON'T enter the code since you will already have hostess benefits coming to you, and you will lose them if your name is not chosen.   
  • On Saturday morning I will e-mail and/or call the winner to get your list, so have your list ready!  You can choose anything in the catalog including the hostess sets found in the back.  Also, there are 5 new totally clear photopolymer sets and Best Of 25 Years -- 6 monthly sets celebrating SU's 25-year anniversary.  You can see these through my SU website in my online store (click on "Shop Now") under Special Offers to see the Best of 25 Years sets and under Stamps to see the Photopolymer sets.
Your Hostess Code is:  J2JBKHNQ

NOTE:  There is nothing different about your online order, except that you are entering the Hostess Code to be part of the larger workshop and hopefully win all the FREEBIES!!  AND your order can include Digital Downloads, special Offers and Clearance Rack items!!  Your order will be shipped directly to you (shipping charges are based on your order only as in a regular online order), and you can download your digital products immediately as you normally would.

Ready....get set....GO!! -- Click on the link to see the beautiful new catalog, and start ordering your favorites right now.  Don't forget to enter the code, or your order won't be included.

My Favorite New Products:
  • The Big Shot Magnetic Platform (p. 184) -- To use with framelits and edgelits so they stay put after you place them!  Best results when used with nice FLAT cutting pads. -- 130658/$39.95
  • Chalk Talk Framelits (p. 187) -- Coordinate with Chalk Talk (p. 12), Notable Notations (p. 98), and Lovely Romance (p. 63) stamp sets. -- 129983/$24.95
  • Candy Dots (p. 171) -- $5.95/see p. 171 for color families -- Use alone or adhere to brad bases.

Have fun!
Marge

Thursday, June 13, 2013

It's been a while.....

It's been a while since I've posted any projects.  Life has been little busy with my daughter's play and my niece's wedding.  My niece's life revolves around horses, so her wedding was a truly western theme..cowboy boots, line dancing, horses and all.  It was such a fun wedding!  So I made her a rather untraditional card for her untraditional wedding.

I realize this card uses mostly retired and non-Stampin'Up! products.  But I thought it turned out really cute, so I thought I'd share it.  You may notice there are 2 different boots....there wasn't room for 2 pairs of boots, so one is the girl's boot the other is the boy's boot.  Notice the boy's boot looks bigger, than the girls boot....same stamp, just positioned so it appears to be bigger.  The idea was the 2 separate boots have now become one pair!  It's ok, my family didn't get it either.

The boots are from a great retired set called "Out West," and the greeting is from the retired set, "Short and Sweet."  I embossed the boots with Early Espresso ep, colored in the swirls with marker, then sponged them with More Mustard, Soft Suede and a tiny bit of Early Espresso Classic Inks.
The greeting is embossed in Early Espresso ep on vellum card stock and punched out with the word window punch, then attached with a brad to a label from the Apothacary Accents framelits pack.

The background is CASEd from a YouTube video by Gina K.  It's a Spotlight Technique she calls Double Letterpress.  I used the same Cuttlebug folder that she did.  The Stampin'Up! colors I used were:  Pool Party, More Mustard and Always Artichoke.  There's also a bit of Soft Suede sponged onto the label.  To add to the distressed look of the card I took out my eyelet setter and pounded a divit into the center of the brad.

I had to send some sympathy and thinking of you cards recently, so this was the result.  It was inspired by a recent card on Michelle Zindorf's blog (card tutorial #609).  I know, they are totally different, but I was mainly inspired by the colors....I've used Pool Party, Island Indigo, Old Olive, Blushing Bride, Primrose Petal and white gel pen.  The set used is Everything Eleanor, and the flowers were colored with markers and blender pen and cut out (I molded the petals of the largest flower to make it stand out more).  I added a few pearl jewels to the centers of the smaller flowers.  I used the same Apothecary Accent label framelit as the last card to cut out the distressed-looking label stamp from Everything Eleanor (the stamp is way bigger than the framelit, so move it around to get the look you want).

Thanks for looking!

Marge
Saturday, April 6, 2013

FREE SHIPPING -- April 6, 7 and 8


STOCK UP!

We're excited to let you know that we are offering FREE shipping on EVERYTHING April 6-8 (excluding expedited orders)! That's right. There are no minimums or limits and all orders qualify! 

Stampin'Up! Color Refresh


Tuesday, January 22, 2013

Sale-a-bration 2013 Begins Today!

This is the time of year that all Stampin'Up! fans look forward to......Sale-a-bration!!  It begins today, January 22nd, and runs thru March 22nd.  And because this is their 25th anniversary, Stampin'Up! has made the promotion even sweeter!  There are 3 ways to get FREE products:


Sale-A-Bration +  Stampin' Up!'s 25th anniversary = the best time to host a Stampin' Up! party!
  • Get FREE Silver Glimmer Paper when you host a $150 workshop!*  
  • Get a FREE hostess bundle when you host a $400 workshop!* 
Hostess Bundle Details:
The Hostess Bundle includes

  • Madison Avenue stamp set (wood- or clear-mount)
  • Sycamore Street Designer Series Paper
  • Sycamore Street Ribbon & Button Pack
*Offers are not incremental (i.e., a hostess does not receive two packages of Glimmer Paper for a $300 workshop or two bundles for an $800 workshop).


Love to shop? How about shopping and getting rewarded? Welcome to Sale-A-Bration!
Customers may choose any one product from the Sale-A-Bration brochure for every $50* they spend. This year's offering includes exclusive stamp sets and accessories, as well as a selection of catalog stamp sets, digital content CDs, ribbon, buttons, and even an embossing folder! Now, more than ever, there's something for everyone! 


Sale-A-Bration + Stampin' Up!'s 25th anniversary = 25% more Starter Kit products for FREE!
(Choose $156.50 worth of product and pay only $99!)

Check out the goodies available in the Sale-a-bration brochure by clicking on the banner at the top of my blog.  Also, check out the new Spring Catalog by clicking on the sidebar icon.  Then click on the  "Shop Now" button at the top of my blog to place your order anytime through my website (you can call or e-maily me as well, especially if you have any questions).

I will be posting samples over the next few weeks, so check back often.  Better yet, subscribe to follow my blog posts (upper right corner of the blog), and receive notifications whenever it's updated.

Happy Stamping (and shopping)!

Marge